 The oil in your vehicle is a lot like the blood coursing through your veins. It’s what keeps the car alive. And every once in a while, it requires a detox to maintain optimal health.
For a car, this means having a regular oil change. In most cases, vehicles need an oil change every 3,000 miles or every three months. So if it’s about that time to have your oil changed, you can either take it to a mechanic or do it yourself.
A lot of today’s car owners are opting for the latter. It’s good to know how to perform an oil change to save money and your vehicle in case you’re unable to get it to a mechanic.
So let’s review the steps it takes to properly change your vehicle’s oil.
Purchase the Right Oil and Filter
Now, you don’t want to make the mistake of purchasing the wrong oil and filter. By now, you should know how detrimental it can be to buy the wrong parts.
Review your car manual (or look it up online) to see what type of oil and filter your engine requires. All makes and models are different, so get it right.
And once you find the right part and oil, go for the premium options. This way, it lasts longer and performs better. One place you can purchase quality motor oil from is PeakHD.com.
Tools and Materials Needed
Next, you need to purchase the right tools and materials for the job. This includes rags, wrench set, oil filter, oil gasket filter, motor oil and a container to pour used oil into.
Make sure to run the car for about five minutes if the engine is cold. If it’s hot, allow it to cool for a half hour to avoid the risk of burns.
Now, let’s get to the steps.
Step 1: Pull the Plug
The first step is to unscrew the plug using one of your wrenches. You can review your manual to locate this beneath your vehicle. Make sure the container is there to catch the oil once it pours out.
Step 2: Remove the Oil Filter
Next, get rid of the old dirty oil filter. Make sure to remove the rubber gasket along with it. This may get stuck, so check for it and pull it off if attached to the engine.
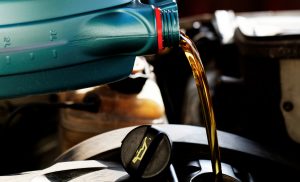
Step 3: Add Clean Oil
After screwing back in the plug, it’s time to get from under the car and pour in some fresh oil. Use your funnel to ensure it pours directly in with little to no mess. Then turn on your car and allow it to run until your oil light turns off.
Then check the dipstick to see if it’s full or requires more oil.
Step 4: Recycle the Old Oil
Before driving off, don’t forget to do something with the old oil. Never toss this out on the ground or down a drain. It needs to be recycled properly. Pour inside of a large used jug and take it to a designated collection site near you.
Start Doing Your Own Oil Change
Learning how to maintain your own vehicle is key to saving money and becoming self-sufficient. We all know how expensive mechanics can be, especially for simple tasks like oil changes.
At YouFixCars, you can learn a lot about auto repair. There are plenty of DIY guides and tips to help you along.
So stop by today to become an educated vehicle owner!