
Here you’ll find some basic check engine light diagnosis tips. This information is intended for driveway mechanics, automotive enthusiasts and car repair consumers that would like to look into the issue before surrendering the vehicle to a shop.
Determining which part or area of a computerized engine control system is defective requires having a thorough knowledge of how the system operates. Thankfully, the set trouble code points you to the system you need to learn more about.
As an example, a P0488 stands for an EGR valve position failure code. Now you can concentrate on just this area of the automobile and learn how an EGR works. Then you can follow a logical troubleshooting procedure until the malfunction is uncovered.
Thanks to the government all late-model computerized engine control systems have on-board self diagnostic capabilities. Using inexpensive tools they can help point you in the right direction.
Since a malfunction in any sensor, output device, or in the computer itself is stored in the computer’s memory, we can extract these diagnostic trouble codes.
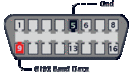
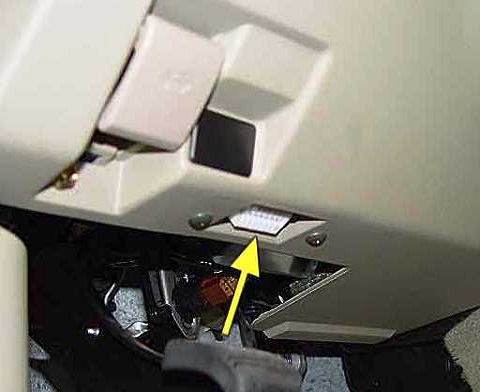
Stored codes can be retrieved with an inexpensive auto scan tool. You can see a large picture at the bottom showing where the OBD II diagnostic port is located. Pulling codes will help isolate the specific systems that contains the failure.
In many cases this will reduce the over all amount of troubleshooting time required. A good car repair manual will not only provide you with repair diagrams and diagnostic charts, but also provides an education of the system that has the defect.
When you understand the operation of the circuit with the problem, the malfunction often seems to jump right out at you. The following methods can be used to check individual system components. I personally always start with a visual inspection. In many cases this first step will direct you right to the particular problem.
Basic Troubleshooting Tests
When performing visual inspections for initial diagnosis look for obvious problems first.
These can often jump right out at you. Any part that is burned, broken, cracked, corroded, or has any other visible problem must be replaced or repaired before continuing with the diagnosis.
Examples of things you may find on a visual inspection include a disconnected sensor. Or maybe even a broken or disconnected vacuum line and also wiring that has been damaged from an external source.
Many times I will find damaged wiring or components from external sources such as mice or rodents. They love to chew on these tasty auto parts. Also when I lived up north it was common to find damage from ice balls, deep snow and corrosion problems caused by salted roads.
Common Electrical Diagnosis on Cars
I always recommend having a automotive meter to perform quick resistance and voltage checks. Most sensors and output devices can be checked with an ohmmeter.
For example an automotive test meter can be used to check a temperature sensors operation. Normally the ohm reading will be very low on a cold engine and high or infinity on a hot engine.
That is when the engine coolant sensor is a positive temperature coefficient or PTC. If the sensor were a negative temperature coefficient or NPC, the opposite readings would be expected on the meter.
Output devices such as coils or motors can also be checked with an ohmmeter. Internal coil resistance readings can be compared to manufacturer specifications listed in your auto repair manuals.
Why not use the same automotive meter to perform voltage checks on sensors. You can compare voltage readings from many sensors, output devices, and their wiring can be diagnosed by checking the voltage to them.
In some cases the voltage that is going away from the sensor needs to be checked carefully. Oxygen sensors that produce their own volts can be tested this way if the scale chosen on the meter is correct.
For additional help I recommend an inexpensive on demand video that covers the subject for about 3 bucks. On the right is a link to OBD-2 automotive repair strategies.
The video goes in depth on many aspects of OBD-2 diagnostics. Learn about the interface DLC connector, common codes, snapshot and freeze-frame mode. Plus all 9 modes of scan tool operation using more advanced scanners. Also see this article about how to use scan tools to pinpoint repairs for the ever common gas cap trouble code.
If you have or own an automotive scan tool that’s capable of reading the activity of sensors (data stream) in real time you can monitor these functions. By watching their activity you’re doing more than just testing the physical operation of the sensor. Often problems elsewhere in the system can cause this device to behave abnormally.
With a little practice a do-it-yourself auto mechanic can pick up these abnormal activities and relate them to the systems that affect these readings in a negative way.
When it comes to engine light diagnosis, technical service bulletins are extremely helpful. If a mechanic does not look for an issued service bulletin many hours of troubleshooting time may be wasted.
This information is available from different suppliers. It’s integrated into the Car Md software and also in the recommended car repair manual available through this website. I put some of the most popular service bulletins together on the auto repair news page.
Looking through my other articles about check engine light common problems might help. This next link takes you to more check engine light information from this page about engine light diagnosis.
Give this check engine light resource page a bookmark or share with a friend. Then return to explore all the links.
If you Like short car repair videos then this next link is for you. You can learn a lot more then just engine light diagnosis tips from my personal collection of auto repair videos.
Here’s a short video that explains why the light comes on and logical steps to take. This next link takes you to a 3 minute check engine light video.
If you would like to find out what else is available on this website and more about the mechanic that built it, the homepage is up next. The page contains an overall site review and more auto repair advice.