
Testing Automotive Relays Explained
Testing automotive relays before replacing them is a good idea and it’s not to difficult.
In most cases if you miss diagnose the electrical problem and buy a new relay and it doesn’t fix the car, you’re stuck with the part you didn’t need.
This is because most auto parts stores have a policy that electrical parts are non-refundable. The good news is, there are several ways to test automotive relays.
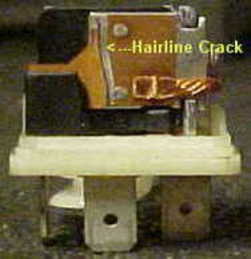
Now you’ll be able to verify it’s bad before you replace it. The picture on the right shows a bad four terminal relay I discovered during a no start diagnoses. This starter relay actually had a material failure in the copper contact blade that completes the circuit.
It cracked causing an open condition resulting in no current flow to the starter motor solenoid.
I don’t see this type of relay failure often. Sidebar: They made this relay in China. For a long time most were made in Germany by the Bosch company.
We might see more failures like this in the future as car-makers cut costs in an attempt to stay competitive with the Korean car builders like Hyundai and Kia. To me this is an unusual failure, With most relays, when we remove the cover, you’ll find burned contacts or melted winding.
The contacts can also become corroded and turn green in color. If it’s severe enough the device won’t flow current or complete the circuit as intended. This condition can stop the car AC compressor clutch from engaging.
So the first way of testing automotive relays is by actually removing the cover and performing a visual inspection.
Note that some companies actually glue the cover on to prevent tampering and seal out moisture. In some instances you can put on a pair of mechanics safety gloves, then take a utility knife and carefully cut the adhesive seal to see inside.
I should also mention some manufacturers make it really hard to get the cover off and in rare cases it’s near impossible. Luckily there are two more good ways of testing automotive relays.
Swapping Out the Old Relay
In some scenarios you’ll need an automotive wiring diagram or at least a professional grade car repair manual that will indicate exactly where the relay is located.
When you find the one you suspect as defective you might see other ones just like it in the relay center. Take a close look at the part number, example 17008-4915. You can locate another one with the same exact part number and swap locations.
This way you can retest your malfunctioning circuit and verify it’s now working with the swapped part in place. You can also check the circuit you swapped from is now not working.
If this is the result, then congratulations, you have definitely nailed down a bad automotive relay. Car makers are always trying to hold down the cost of manufacturing.
They often use the same part number components for many different circuits in the vehicle. This allows them to mass produce these electrical parts and just plug them in during assembly.
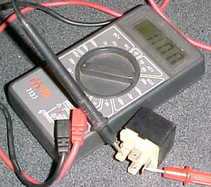
Use this to your advantage and swap them out. The way that an automotive relay should be tested is to actually break out an automotive test meter and confirm proper operation of the relay.
When testing relays it’s important to remember they’re not as complicated as they seem and neither is the test procedure. In fact, they even make a plug in tester that shows a red light if the relay is bad and green if it’s good. This tool is on the right.
How Relays Work in Cars
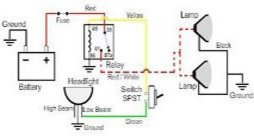
Most relays have four or five terminals. The job of this electrical component is to physically connect two of those terminals on command to allow electricity to flow to the load in the circuit.
The load would be something like an ac compressor, starter motor, fuel pump and so on. Again you’ll probably need an automotive wiring diagram to determine which terminals connect to which wires.
Basically, we use two terminals to energize the magnetic coil that pulls a contact closed. This allows the electrical current to flow. When properly testing automotive relays you need a 12 V battery to energize the coil.
Take 12V and apply it to one side of the coil and a good ground to the other side. I have a car battery for bench testing but you can disconnect the one in the car and use it for this test.
With the coil energized the switch should open or close and you can verify the current flow by using a meter set on the continuity check setting.
In this mode your meter automatically beeps when the circuit closes and working properly.
If this test fails and the switch doesn’t open and close by energizing the magnetic coil, perform another test with an automotive meter. Physically check the resistance of the magnetic coil by selecting the resistance mode or Ohms on your meter.
You touch one lead to one terminal of the coil and the other lead as well. A magnetic coil in an automotive relay should have just about no resistance. Your meter should read close to zero ohms. Testing automotive relays takes a little practice but is well worth the effort.
These types of repairs can be very expensive at your auto repair center because they require a good amount of skill level. This is also an automotive repair that is clean and exercises the brain. If the air conditioning relay fails the car AC system blows warm air.
This next link will take you to some additional information on the youfixcars.com site so you can learn about automotive electrical systems.
If you would like to see what else is covered on the website you can visit this next link that will take you to the Homepage for YouFixCars.com.