Taking a little extra care when you’re installing brake pads ensures you’ll get the maximum life out of them. One of the often overlooked items would be to either recondition or replace the hardware.
This supports proper caliper movement and can also help prevent brake noise and uneven pad wear. At the bottom I’ve added special brake tools and supplies professionals use when performing high quality brake replacements.
I also added a 2 minute video showing the hang pad procedure. Although the video was more of a slap and go operation this would be a good example of how flat rate mechanics do the job.
You on the other hand, can take your time and get better results. This is of course if you listen to me and replace the old hardware.
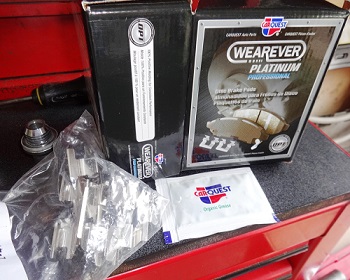
A quality disc brake replacement kit will come with new retention clips and specialized lube. On the left is an example of a brake service kit that comes with a nice set of disc pads.
if new spring clips, rubber boots and a lube packet doesn’t come with the new friction pads you didn’t spend enough.
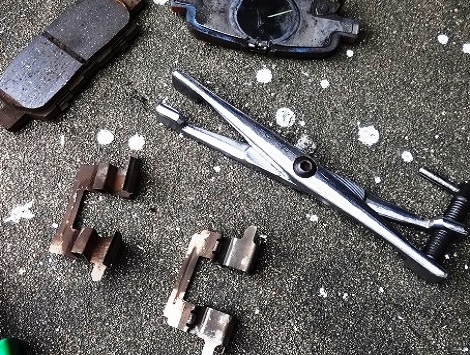
To make matters worse many brake shop mechanics throw these away to save time. I posted a picture at the bottom of some old hardware so you’ll see the need to replace it.
Even a Noob will Use the Right Lube
When ever I’m replacing front or rear disc brake pads I take the extra time to replace the old caliper slides or at least disassemble clean and properly lubricate the slides.
I prefer to use specialized caliper lube for this. It lasts longer and is water proof. If you use regular grease or even worse, something like Vaseline, the lubricant will not stand up to the extreme heat that it’s exposed to.
If you use the wrong kind of lubricant on the caliper slides they can begin to bind down the road and cause problems. The incorrect stuff like petroleum jelly can melt and drip onto the replacement brake pads and the rotors.
As you can imagine lubricant on the actual braking surface of the pads or rotors can cause a lot of problems. The least of which, are an extreme amount of brake noise or a pulling condition. Nevertheless, it’s the increased stopping distance that’s the most concerning issue.
Replacing Disc Brake Pads
It’s the design of the disc brake calipers that will determine what procedure needs to be followed on your particular automobile.
Fixed calipers and floating ones will have different steps for installing brake pads. When in doubt consult an online car repair manual for your specific vehicle.
With that said, to follow we’ll have some general tips and instructions that can help improve the results on all automobiles.
When installing brake pads on some vehicles the caliper retaining bolts will actually hold the pads in place. On these types of systems sometimes the factory will secure the caliper bolts with a thread locking compound to prevent them from backing out.
When thread locker is used it might be difficult to remove the bolts. However, more importantly the old thread locking compound should be cleaned off and fresh loctite applied when you reassemble.
I know it might sound time consuming and unnecessary, but this will prevent thread damage and make future brake jobs easier. Also take the time to torque the bolts to the recommended specifications.
When you’re replacing disc brake pads the new ones will be thicker than the old ones. This means that the caliper piston needs to be pushed back into its bore to make room for the new and thicker pads.
There are several methods and tools available. They make specialized tools, not surprisingly, called a caliper piston compressor. I see a lot of mechanics use a C-clamp and a block of wood to seat the piston back in its bore.
No matter what method you use it is most important that the piston be pushed back evenly and with some patience. When you apply pressure to the piston the fluid must move back up through the system.
You want to take care that you do not cock the piston when pushing it back in. If the piston does go in crooked it could damage the seals or the cylinder walls of the caliper bore. And using excessive force can possibly damage the piston itself.
Reinstalling the Brake Caliper
After the pads are installed on a floating disc brake caliper type braking system, it’s time to remount the caliper to the steering knuckle.
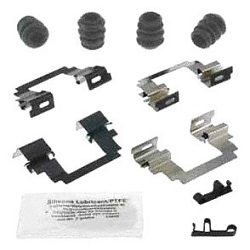
Pictured to the right are replacement General Motors caliper slides and bolts. In most cases people do not disconnect the brake line during a standard service.
However, you must make sure that the rubber brake hose that feeds the caliper is not twisted or kinked. On a front disc brake system it is the rubber brake hose that allows for the wheel to turn left and right when the driver is steering.
If you remount the caliper and the hose is twisted it may pull tight when the vehicle is turning and leak fluid out.
This is why I like doing one side at a time. If you use this method you can just look at the other side as a guide on how it should look when its all back together.
After installing brake pads it’s time to check the hydraulic fluid level. Do not perform this step until after the maintenance repairs are completed.
Because of the new and thicker brake pads the piston will be seated further back in its bore and this will push fluid up into the master cylinder reservoir.
If you were to fill the fluid first the master cylinder reservoir may wind up overfull when you’re finished. You also want to make sure that you follow the manufacturer guidelines on what type of fluid is being installed.
In most cases the type of hydraulic brake fluid to use is printed clearly on the master cylinder cap and in the owner’s manual as well. Share this installing brake pads page or give it a bookmark.
Brake Pad Installation Video
Don’t forget to clean, lubricate or replace your disc brake caliper slides
If you want the best possible results and longest lasting trouble free braking consider replacing the rotors at the same time. Here is the top twenty five Best selling brake rotors.
For more information about the theory and operation of this important vehicle safety system visit my car disc brakes section.
Some people are more comfortable with videos instead of reading a page full of tips. Here is another video showing a mechanic installing brake pads.
If your looking to find out what other kinds of car repair information is available on this site this next link will take you to the homepage. Here you can also find out how to ask auto repair questions.