Car AC Compressor Replacements
The car ac compressor is under more stress than any other component in the automotive air conditioning system. It’s for this reason that compressor problems are not unheard of even on the most prestigious cars.
They can be one of the most expensive issues you experience with your vehicle over it’s normal life cycle. Many if not all AC compressor failures will fall into two main categories. This would be an internal failure or an external one.
Determining what category your problem is in will be important to the longevity and cost of repairs. The external compressor malfunction is the best-case scenario for car owners.
This is when the clutch fails or another exterior component such as the pulley or bearing. This may also include a freon leak from the front shaft seal or failure of the high pressure cut out switch.
Why is this good? It’s because with these kinds of AC problems the internal workings of the compressor will be in tact. The external problem can be repaired without having to worry about flushing metallic contamination from individual components.
The internal failure of an air conditioning compressor is the worst-case scenario. This is bad, because when it comes apart inside it can spread damaging metal parts through the entire air conditioning system.
These fragments stick to the thin oil mixed with the Freon which is how the compressor is lubricated. This is why the debris can be challenging to remove and cause repeat compressor failures.
AC Compressor Replacement Instructions
The following instructions were provided in an air conditioning compressor replacement kit that I recently installed. I thought I would provide the steps so you could see what’s involved in compressor replacement.
1) Always wear eye protection. Identify and remove refrigerant in accordance with any state and federal regulations before working on the vehicle.
2) Remove the failed compressor from the vehicle. Transfer any switches, sensors, brackets, or manifolds from the original compressor to the replacement unit.
On many GM models the high pressure cut out switch (red) is located on the back of the compressor. It must be transferred over to the replacement part. It’s retained by a small snap ring and sealed with an o-ring.
3) Thoroughly flush each component not being replaced with an approved AC flush solvent. Once each component has been flushed of all contamination it is necessary to air dry these components using compressed and/or filtered shop air to insure no flushing solvent remains.
4) Replace the accumulator or dryer and all expansion devices. This would include the orifice tube and screen that most vehicles use today. Note: some Dodge and heavy duty trucks use an expansion valve instead of an orifice tube set up. Refer to your car repair manuals for vehicle specific instructions.
5) After installing the replacement compressor on the vehicle ensure proper mounting and belt alignment.
6) It is recommended to install an in-line filter in the suction line near the compressor inlet. This will prevent possible debris from entering and destroying the replacement unit.
7) Add the proper type and amount of ac oil as per manufacturers procedures. Some suppliers of re-manufactured compressors install the oil in their unit. Be sure to follow any and all instructions that come with the replacement air conditioning compressor.
8) Apply a vacuum to the car ac system. A minimum of 29 inches of mercury for one hour to insure moisture and residual flushing solids or boiled from the system.
9) Recharge your air conditioning system using the recommended Freon only. Use a scale, metering device or buy different sized cans to ensure the proper amount of refrigerant is installed, specified by the vehicle manufacturer.
Improper refrigerant charges are another major cause of premature failure of car ac compressors and poor system performance.
10) When you’re finished with your repairs conduct a complete system performance test. Each component in the system must be evaluated.
Many compressor malfunctions are the result of another failed component within the system. Failure to diagnose additional problems can cause the new unit to fail again.
Condenser and combination radiator fan motors are components that can cause these failures, because of high system pressures. When these fans malfunction the AC compressor is pushing against pressures much higher than normal conditions.
Car AC Compressor Problems
As you can see from the instructions above an internal compressor failure that has spread metal through the system is a challenging repair for even the most experienced automotive mechanic.
When you remove the original compressor signs of this failure will be metal flakes around the outlet port. You can also drain the oil out of the old unit and examine the fluid for suspended metal flakes.
Another telltale sign of internal compressor failure will be metal chips and debris clogging the orifice tube screen. If you see these signs of metal chips and debris make sure that you follow the above steps to protect the new compressor.
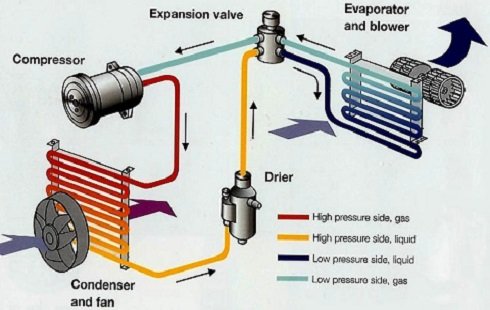
The most important step is proper flushing. There’s nothing worse than spending a lot of time and money on a repair just to have it fail the next day. Review the expansion valve type AC system diagram info graphic below for more information on correct system operation.
Bookmark this car ac compressor resource page or share with a friend.
Want more information about how a car ac system operates? I have several pages that describe the theory and operation. It’s much easier to diagnose and repair when you have a full understanding of how it works. This link takes you from car ac compressor to automotive air conditioning.
Car AC Supplies | R-134a AC flush kit and tools.
I also have a simplified diagram of how he automotive air-conditioning system cools the interior of your car by refrigerant temperature differentials. Take a look at this next diagram and see how your automobile air conditioning system operates.
The home page is up next and provides a quick run down of what other types of auto repair information is available here. Also meet the mechanic that is still performing high quality auto repair at home.